
Natella Zadeh
Author
If you are a video content creator or on the way to becoming you may be wondering how to schedule YouTube videos to improve the quantity and quality of your uploaded videos. To assess this argument we first need to answer some of these questions.
Why schedule YouTube videos?
We understand that it is irresistible to post a video as soon as it is filmed and processed. Considering the amount of energy you put into writing scripts, recording, and editing videos it is explicit that you want to share it with your subscribers and get the desired outcome. But to schedule YouTube videos there are lots of points that you should take into account.
First of all, scheduling videos on YouTube in advance relieves the stress of physically being online. You just set the date/time and YouTube or a scheduling platform will take care of the rest. From an efficiency point of view, scheduling ensures that your videos still go online while you are away.
As with Facebook, LinkedIn, or any other social platform, YouTube lets you target your audience. When you know how to schedule a YouTube video, you set the time when your subscribers are online and active. You may be editing your video at 5 AM and uploading it right after finishing it. It is very unlikely that you will get higher views or engagement during these hours.
Scheduling gives you an opportunity to publish them in different time zones thus initiating more views across different regions.
Additionally, it gives you an opportunity to schedule YouTube videos all at once. Swaying posting times between videos gives them time to breathe and perform while making your channel more rich and attractive.
After all, it is always rewarding to experiment with different times to see what hours your videos attract more views.
How to schedule YouTube videos on the desktop?
If you are dedicated to posting on YouTube you need to plan what you are going to do in the next few months. Make a list of topics that you want to cover with their planned posting times. Another benefit of scheduling YouTube videos is that it helps with the planning of your social media calendar.
But before knowing how to schedule a YouTube video you need to verify your YouTube account. In order to verify your channel, you need to go to YouTube and sign in to your account. From the profile icon of your YouTube, click on the third option: YouTube’s Creator Studio.
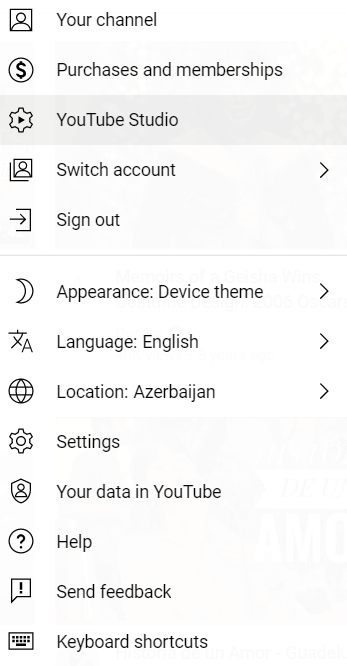
This will land you on the dashboard of your channel. From the left menu underneath your profile icon click on the Settings to proceed. In the opening menu, YouTube will ask you several questions about the country of origin, the purpose of the channel, and the main keywords. Check out this article to choose your favorite tool before doing keyword research on YouTube. In the third row click on Channel and then Feature eligibility.
For the Intermediate features like longer videos, live streams, custom thumbnails you are required to verify your phone number. While the Advanced features include more live streams, shorts, and embed live streams. But you can get this feature after your channel grows more than 1K subscribers and 4K view hours. This gives content creator monetization options. In order to verify the Advanced account, you need to upload the photo of a governmentally-issued ID card, 30-second video verification from your phone’s camera which takes up to 1-day of approval.
Once all features are done, you are ready to take full advantage of YouTube. But you can still schedule YouTube video content with just phone number verification and upgrade later based on your progress.
Generally, there are two answers on how to schedule YouTube videos. The first is offered by YouTube itself.
1. Upload the video
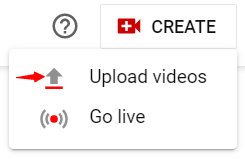
Click on the camera icon at the top right of your screen and then click upload video. If you are on the YouTube Studio, this will be a red Create button.
From the opening dialog window, click on the Select videos button or drag and drop them to upload.
2. Enter your video details
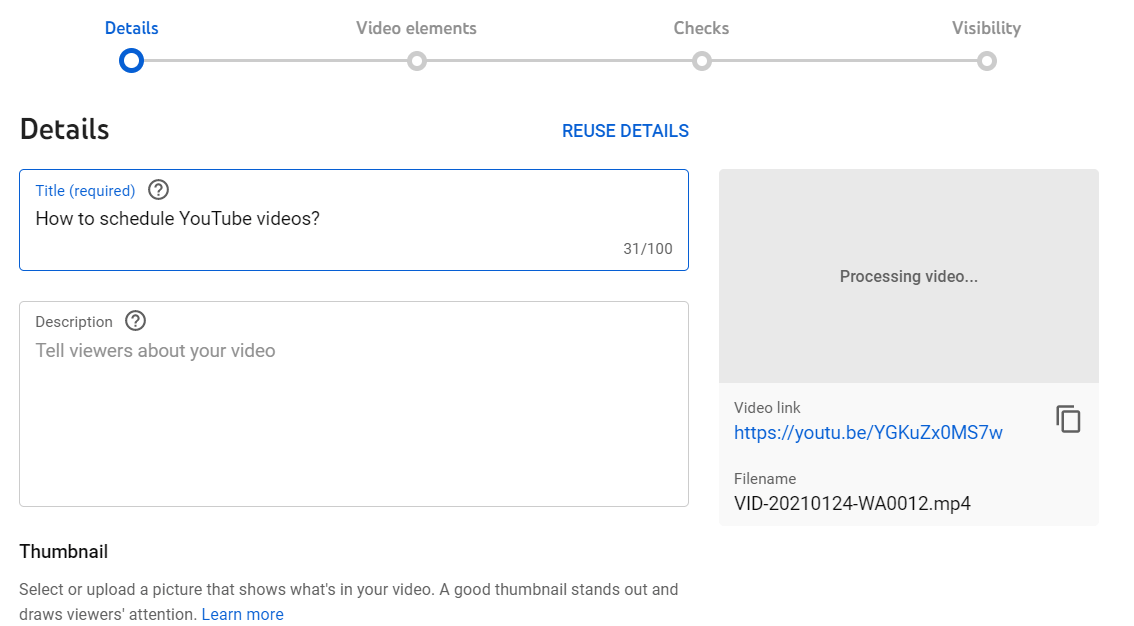
The Details section contains several fields that you have to fill before scheduling. You need to add a video title, description, and thumbnail images which are crucial for getting high clicks. While scrolling through you have to choose which playlists you want the video to appear, ensuring audience details about their eligibility for certain ages.
Underneath the section, you have to verify if the video contains promotions like product placements, sponsorships for authenticity. After these, there are a couple more steps like language verification, video category that has to be confirmed.
3. Select to schedule
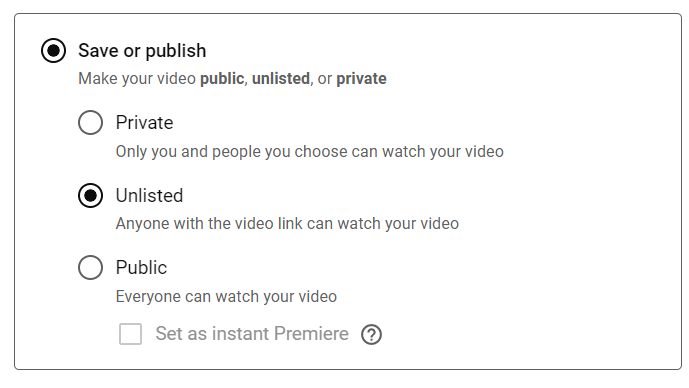
After you complete the video details and elements, you will land on the Visibility tab. First, you have to identify the audience of the video. From the visibility options, you can choose:
Private - only you and the people you choose can see the video
Unlisted - the video can only be viewed by the people who have access to the link
Public - where everyone can see the video
Schedule - videos are used only when they are published.
Since the aim is to schedule the video, select the Schedule and pick the date and time you would like the video to go live. Note that only public videos can be scheduled.
4. Click the schedule
Once you hit the Schedule button at the bottom of the box, your video will be published on the set time. Moreover, you can edit or reschedule the publish date and time whenever you want before it goes live. You can review the scheduled videos from the Content section underneath your profile icon. Click on the checkbox at the left side of the box and then Edit or More actions tabs for these options.

The Edit tab will lead you back to the first window when you scheduled the video. Here, you can edit video title, description, tags, audience details, thumbnail, or category. If you want you can also reschedule the time and click save at the end. But the More actions button is considered for completely deleting the video.
The problem with using YouTube while scheduling YouTube videos is that you can only upload them to the platform itself. For multi-channel content creators or businesses that post on several networks, it is still a tedious job to schedule on each platform. Thankfully, there are lots of social media management tools for handling the issue. The tools like Hootsuite, TubeBuddy, or Sprout Social can help you unpack private scheduling options and suggest data-powered tools to find the best time to publish them.
If you are using WordPress, you can easily display your channel feed using WordPress YouTube plugins. For this, you need to add your YouTube account to the tools and then start to schedule.
How to schedule a YouTube video on the phone?
Considering the rising popularity of mobile devices, we also include the way to schedule YouTube videos on mobile. For this, you have to install two major apps on your mobile device: YouTube and YouTube studio. YouTube studio is also helpful for displaying analytics in a mobile-friendly way.
1. Upload the video to the YouTube app
First, sign in to your YouTube account to start. Then click on the + icon and then Upload the video. Just like with the desktop version, add the video title, description, location, and audience details. Make sure that the uploaded video is in Private format. After these, you are done with the YouTube app.
2. Open YouTube Studio app
The uploaded video in the YouTube app will be visible in the YouTube Studio app. Click on that private video and then the Edit button in the right top corner of the screen.
3. Schedule the video to go public
Once you hit the Edit button, it will open the formats including the Scheduled option. Tap that and then the date and time you would like the video to go live. Finally, click Save to finish the scheduling process. You can review the scheduled videos from the Channels list.
Cheatsheet to check when you schedule YouTube videos
Since the purpose of scheduling videos on YouTube is to strengthen the content creation process, it can be armed with best practices. You can look at this checklist for a coordinated scheduling experience to grow your channel.
1. Pay attention to your description
Write catchy titles that hook the audience’s attention. But avoid using spam words that may give a reverse effect. It has to let viewers expect what to see in the video.
Description box gives you more freedom to provide the details of the video. Make sure you include the keywords for more visibility. It ensures that your video is searchable and relevant.
2. Oversee your content calendar
As we stressed earlier in this article, scheduling has enormous benefits for keeping track of the content calendar. By reviewing your scheduled videos, you can spot the missing content in your calendar and also avoid duplicate posts.
3. The ideal number of uploads
Uploading regularly is a big part of the game. Frequently posting and urging viewers to subscribe can keep your channel on top of their minds, settle audience expectations, and help surface your videos more often.
But the practice commands to schedule YouTube videos at a particular interval. This way subscribers know when to view your new content. It is worth mentioning that your post frequency also depends on the topic of content and the formats of videos.
4. Search trends
Pretty much in every niche, there are specific events that spike around certain times of the year. That can be Cyber Monday for WooCommerce sites, inno-weeks for technology companies, game launches for gamers, etc.
Many YouTubers make success by producing videos that are related to those events. As a content creator, make sure to catch up with the industry trends and incorporate them into your calendar.
Although we are fond of sticking to your content calendar if you can go beyond your regular strategy to take advantage of special events.
5. The best time to schedule
The best time for scheduling depends on the type of content, geographic location of the country, and of course, the audience habits. You can use YouTube Analytics or third-party tools analytics to check in with the audience. This will give you the sense of who is viewing your videos when you get more viewers engaged, and schedule YouTube videos on times that are most likely to be viewed.
Last words
If you are creating video content for your YouTube marketing strategy you might be curious about how to schedule YouTube videos in advance. Because it helps you to get ahead of your content calendar and reserve more time for meaningful tasks. By experimenting with different video formats and how your audience responds to them you can evaluate the effectiveness of each video format more accurately and find out the right frequency for your calendar.



![How to Schedule Instagram Stories with LInks [GUIDE]](https://www.fs-poster.com/storage/posts/777909e1f43231e170b9a951c3e820d7.png?v=1745836775)
